Ready to expand your network and find your perfect match? This guide will show you how to find new connections, send and manage friend requests, keep your friend list organized or remove any unwanted connections.
- Finding a New Connection
- Adding or Removing Friends from Friend List
- Adding Friends
- Why the “Add Friend” Button is Missing?
- Removing Friends
- Viewing and Accepting Friend Requests
It’s easy to make Friends:
- Do a Search for members YOU think are sexy
- Look for Friends in Hot Videos and Hot Albums
- Find members online in chat rooms and Instant Messenger
- Accept Friend requests from other members
Adding or Removing Friends from Friend List
Adding Friends
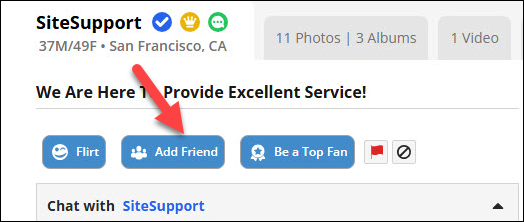
There are several ways to add someone as a friend on our platform. The easiest method is to visit their profile page and click the “Add Friend” button.
To add a friend to your network, please follow the steps below:
1. Find and click the “Add Friend” button.
2. Add a personal message for the best chance to have your friend request accepted.
3. Send your request!

Note: You must have a premium membership in order to send friend requests.
Apart from the profile page, you can also add a member as a friend from the following places:
- A member’s profile quick view on the search results page, broadcast page, the message center or in the hottest photos or hottest videos pages
- The conversation page on Instant Messenger
- Your hotlist
- By hovering over the “Interact” button in the full-size view of a photo or video in the activity feed or in the hottest photos or hottest videos pages
Why is the “Add Friend” Button Missing?
Sometimes, you might notice that the “Add Friend” button is missing or disabled. If this happens, please review the possible reasons listed below:
You may already have sent a friend request
You won’t see the Add friend button if you’ve previously sent them a request and they haven’t accepted it yet, even if you sent that request years ago.
The person doesn’t accept friend requests and wants to take a break from receiving requests
If you don’t see the “Add Friend” button, it could be because the person you are trying to add isn’t accepting friend requests at the moment. They may have turned off the “Add Friend” link on their profile to take a break from receiving requests. You can check out Privacy Preferences to enable or disable that setting for your own profile.
Removing Friends
1. Log into your account and click on the logo in the upper right corner to access your home page.
2. In the left pane under “My Favorites” click on “Friends”.
3. On your My Friends page, find the friend you’d like to remove from your Friends List.
4. Click on the gray “x” on the right of the listing for the friend you want to remove, then click “Yes” to confirm you want to remove that friend.
Once clicked, that member will instantly be removed from your Friends Network.

Viewing and Accepting Friend Requests
When you log into your account, you will see a notification if you have received a friend request. Click or tap the notification to see your list of friend requests.
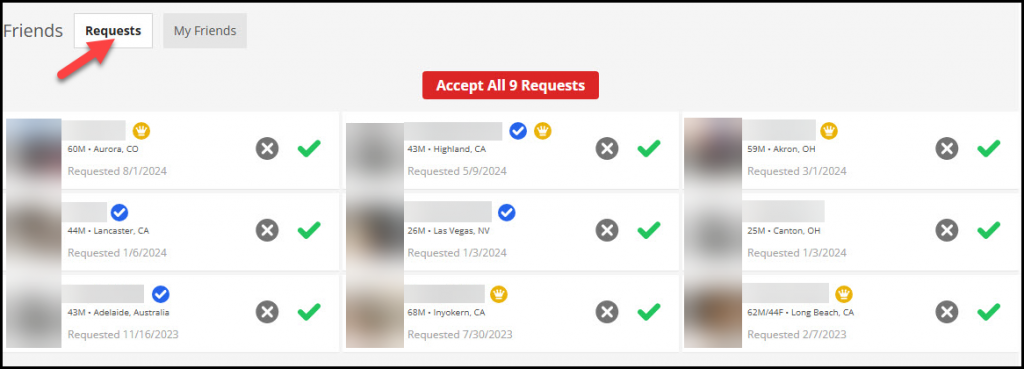
You can also view, accept or decline your pending friend requests by going to the “Friend Requests” section on your friends page.
1. Login to your account.
2. Click on “Friends” from the left hand sidebar under My Favorites.
3. On your My Friends Network page, click on “Requests”.
4. To respond to a request, click the check mark to Accept or the “X” icon to Decline.
If you have a large number of requests and want to accept all of them, choose “Accept All” to accept all of your pending friend requests.
